Searching for a shell
Personal Vim config (update 2022)
TL;DR: I’ve moved on from Atom to Vim. This is a (step-by-step) documentation of my Vim config. The target audience of this tutorial is people familar with basic Vim commands and want to make their Vim experience better.
Story
Yesterday, I discovered the death of my favorite text editor/IDE atom. I’ve always known tha this was going to happen eversince the Microsoft takeover of Github in 2018. Eventhough the CEO of Microsoft, Nat Friedman, at that time specifically reassured that Atom will continue to be developed along side VS code.
Four years later, it’s all comimg to an end ![]() .
Atom has tons of awesome featrues that others don’t have, accompanied by a huge free software community where plugins like Hydrogen, platformio-IDE thrive.
Combined with a set of default color presets and themes, Atom is truely one of a kined.
.
Atom has tons of awesome featrues that others don’t have, accompanied by a huge free software community where plugins like Hydrogen, platformio-IDE thrive.
Combined with a set of default color presets and themes, Atom is truely one of a kined.
Although the edior itself is opensource which means it’ll probably still live for many years to come, it will, eventually die. As a consequence of this, I have decided to start my transition now rather than later, to the legendary text/IDE/all-in-one code - Vim.
Why Vim?
I’ve actually been a “not-so-avid” Vim user for aorund 6 years now. I mainly use it on HPCs because it’s usually preloaded and usually superfast to pull up.
The reason I didn’t bother learn nano or emacs is maybe due to anchoring bias as Vim is the first text editor that I came in contact with when I was familiarizing myself with the commond line interface.
(yse, I’m old but not THAT old, my first computer did have a GUI…)
But another huge reason is, I think, because I’m way too afraid to loose another text editor.
Vim has survived/shrived 31 years (as of now, 2022) and doesn’t really rely on any company or entity to provide support to its development
So, in a sense, it’s one of the “real” free softwares out there.
Comparing to traditional text editors, Vim is supposedly “keyboard-only” (eventhough some of its’ feature only suuports mouse scrolling… popup scrollbar, I’m looking at you![]() ).
For example, one can navigate their cursor by pressing simply pressing “hjkl”, jump from words to words by pressing “w” or “b”.
This provides a unparallel speed when you are really in the “zone”(if you have familiarized yourself with the control).
).
For example, one can navigate their cursor by pressing simply pressing “hjkl”, jump from words to words by pressing “w” or “b”.
This provides a unparallel speed when you are really in the “zone”(if you have familiarized yourself with the control).
Now that I’ve babbling long enough, let me show you my config.
Vim config
The goal of this tutorial/walk-through is to make vim:
- to have (python) autocompletetion that’s async (doesn’t slow down your typing experience) and fast.
- can run ipython directly (by sending code snippets to ipython command line)
- look like Atom (one-dark theme!).
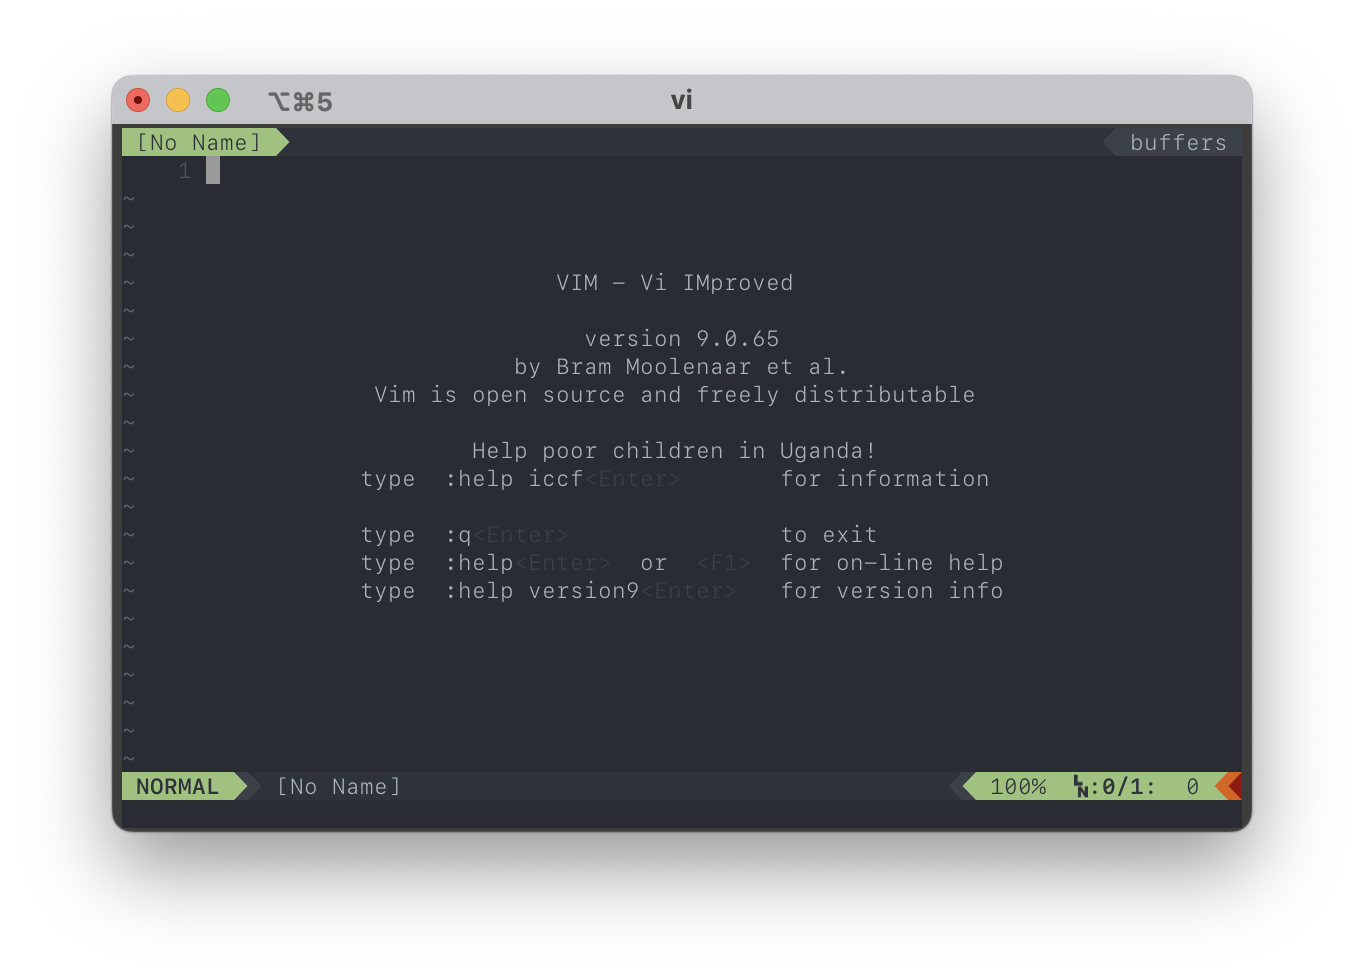
I’ve opted to ues Vim version 9.0.65 (the latest and shineset, again, in SEP/2022) on my Mac. I use Macports so installing it would require only one line of command:
sudo port install vim +python39
note that the +python39 is needed for later IDE integration.
Next up, install the vundle package manager:
git clone https://github.com/VundleVim/Vundle.vim.git ~/.vim/bundle/Vundle.vim
and activate it by putting the folloiwng into ~/.vimrc:
set nocompatible              " be iMproved, required
filetype off                  " required

" set the runtime path to include Vundle and initialize
set rtp+=~/.vim/bundle/Vundle.vim
call vundle#begin()
" alternatively, pass a path where Vundle should install plugins
"call vundle#begin('~/some/path/here')

" let Vundle manage Vundle, required
Plugin 'VundleVim/Vundle.vim'

" The following are examples of different formats supported.
" Keep Plugin commands between vundle#begin/end.
" plugin on GitHub repo
" Plugin 'tpope/vim-fugitive'
" plugin from http://vim-scripts.org/vim/scripts.html
" Plugin 'L9'
" Git plugin not hosted on GitHub
" Plugin 'git://git.wincent.com/command-t.git'
" git repos on your local machine (i.e. when working on your own plugin)
" Plugin 'file:///home/gmarik/path/to/plugin'
" The sparkup vim script is in a subdirectory of this repo called vim.
" Pass the path to set the runtimepath properly.
" Plugin 'rstacruz/sparkup', {'rtp': 'vim/'}
" Install L9 and avoid a Naming conflict if you've already installed a
" different version somewhere else.
" Plugin 'ascenator/L9', {'name': 'newL9'}

" All of your Plugins must be added before the following line
call vundle#end()            " required
filetype plugin indent on    " required
" To ignore plugin indent changes, instead use:
"filetype plugin on
"
" Brief help
" :PluginList       - lists configured plugins
" :PluginInstall    - installs plugins; append `!` to update or just :PluginUpdate
" :PluginSearch foo - searches for foo; append `!` to refresh local cache
" :PluginClean      - confirms removal of unused plugins; append `!` to auto-approve removal
"
" see :h vundle for more details or wiki for FAQ
" Put your non-Plugin stuff after this line
then initialize it by:
vim +PluginInstall +qall
With Vundle, you can install any Vim pakcage that’s hosted on Gihub by simply adding the author/repo_name combo in a form of Plugin 'author/repo_name' in .vimrc
Now, let’s beautify our vim.
First, install vim-airline/vim-airline, vim-airline/vim-airline-themes and rakr/vim-one by putting the following into yout .vimrc:
Plugin 'vim-airline/vim-airline'
Plugin 'vim-airline/vim-airline-themes'
Plugin 'rakr/vim-one'
and issue the following in command line:
vim +PluginInstall +qall
To activate the theme, add the following to your .vimrc:
""--------------
"vim-airlines
""--------------
"let g:airline_theme='jellybeans'
let g:airline_theme='one'
let g:airline#extensions#tabline#enabled   = 1
let g:airline#extensions#tabline#fnamemod  = ':t'
let g:airline_powerline_fonts              = 1
let g:airline_section_c                    = '%F'
let g:airline_section_z                    =
  \'%3p%% %{g:airline_symbols.linenr}%#__accent_bold#%l/%L%#__restore__#:%3c'
let fortran_free_source=1
let fortran_have_tabs=1
let fortran_more_precise=1
let fortran_do_enddo=1

" -------------
" set onedark theme
" -------------
syntax on
"colorscheme onedark
colorscheme one
set background=dark " for the dark version
"set background=light " for the light version

if (has("nvim"))
  "For Neovim 0.1.3 and 0.1.4 < https://github.com/neovim/neovim/pull/2198 >
  let $NVIM_TUI_ENABLE_TRUE_COLOR=1
endif
"For Neovim > 0.1.5 and Vim > patch 7.4.1799 < https://github.com/vim/vim/commit/61be73bb0f965a895bfb064ea3e55476ac175162 >
"Based on Vim patch 7.4.1770 (`guicolors` option) < https://github.com/vim/vim/commit/8a633e3427b47286869aa4b96f2bfc1fe65b25cd >
" < https://github.com/neovim/neovim/wiki/Following-HEAD#20160511 >
if (has("termguicolors"))
  set termguicolors
endif
Fire up your vim, you should see it looks like this:
To enable autocompletetion, I use coc.nvim.
coc.nvim requires node.js (v14.14 and up) and npm, since I’m using port, it can be installed by:
sudo port install nodejs18 npm8
Now, to install coc.nvim, add the following to your .vimrc:
Plugin 'neoclide/coc.nvim'
and issue the following in your command line:
vim +PluginInstall +qall
The final step to activaet coc.nvim is to compile the necesseary files:
cd /Users/chengcheng_xiao/.vim/bundle/coc.nvim
npm install
npm audit fix
Next up, we need to configure coc.nvim, simply add the following to your .vimrc:
" Some servers have issues with backup files, see #649.
set nobackup
set nowritebackup

" Having longer updatetime (default is 4000 ms = 4 s) leads to noticeable
" delays and poor user experience.
set updatetime=300

" Always show the signcolumn, otherwise it would shift the text each time
" diagnostics appear/become resolved.
set signcolumn=yes

" Use tab for trigger completion with characters ahead and navigate.
" NOTE: There's always complete item selected by default, you may want to enable
" no select by `"suggest.noselect": true` in your configuration file.
" NOTE: Use command ':verbose imap <tab>' to make sure tab is not mapped by
" other plugin before putting this into your config.
inoremap <silent><expr> <TAB>
      \ coc#pum#visible() ? coc#pum#next(1) :
      \ CheckBackspace() ? "\<Tab>" :
      \ coc#refresh()
inoremap <expr><S-TAB> coc#pum#visible() ? coc#pum#prev(1) : "\<C-h>"

" Make <CR> to accept selected completion item or notify coc.nvim to format
" <C-g>u breaks current undo, please make your own choice.
inoremap <silent><expr> <CR> coc#pum#visible() ? coc#pum#confirm()
                              \: "\<C-g>u\<CR>\<c-r>=coc#on_enter()\<CR>"

function! CheckBackspace() abort
  let col = col('.') - 1
  return !col || getline('.')[col - 1]  =~# '\s'
endfunction

" Use <c-space> to trigger completion.
if has('nvim')
  inoremap <silent><expr> <c-space> coc#refresh()
else
  inoremap <silent><expr> <c-@> coc#refresh()
endif

" Use `[g` and `]g` to navigate diagnostics
" Use `:CocDiagnostics` to get all diagnostics of current buffer in location list.
nmap <silent> [g <Plug>(coc-diagnostic-prev)
nmap <silent> ]g <Plug>(coc-diagnostic-next)

" GoTo code navigation.
nmap <silent> gd <Plug>(coc-definition)
nmap <silent> gy <Plug>(coc-type-definition)
nmap <silent> gi <Plug>(coc-implementation)
nmap <silent> gr <Plug>(coc-references)

" Use K to show documentation in preview window.
nnoremap <silent> K :call ShowDocumentation()<CR>

function! ShowDocumentation()
  if CocAction('hasProvider', 'hover')
    call CocActionAsync('doHover')
  else
    call feedkeys('K', 'in')
  endif
endfunction

" Highlight the symbol and its references when holding the cursor.
autocmd CursorHold * silent call CocActionAsync('highlight')

" Symbol renaming.
nmap <leader>rn <Plug>(coc-rename)

" Formatting selected code.
xmap <leader>f  <Plug>(coc-format-selected)
nmap <leader>f  <Plug>(coc-format-selected)

augroup mygroup
  autocmd!
  " Setup formatexpr specified filetype(s).
  autocmd FileType typescript,json setl formatexpr=CocAction('formatSelected')
  " Update signature help on jump placeholder.
  autocmd User CocJumpPlaceholder call CocActionAsync('showSignatureHelp')
augroup end

" Applying codeAction to the selected region.
" Example: `<leader>aap` for current paragraph
xmap <leader>a  <Plug>(coc-codeaction-selected)
nmap <leader>a  <Plug>(coc-codeaction-selected)

" Remap keys for applying codeAction to the current buffer.
nmap <leader>ac  <Plug>(coc-codeaction)
" Apply AutoFix to problem on the current line.
nmap <leader>qf  <Plug>(coc-fix-current)

" Run the Code Lens action on the current line.
nmap <leader>cl  <Plug>(coc-codelens-action)

" Map function and class text objects
" NOTE: Requires 'textDocument.documentSymbol' support from the language server.
xmap if <Plug>(coc-funcobj-i)
omap if <Plug>(coc-funcobj-i)
xmap af <Plug>(coc-funcobj-a)
omap af <Plug>(coc-funcobj-a)
xmap ic <Plug>(coc-classobj-i)
omap ic <Plug>(coc-classobj-i)
xmap ac <Plug>(coc-classobj-a)
omap ac <Plug>(coc-classobj-a)

" Remap <C-f> and <C-b> for scroll float windows/popups.
if has('nvim-0.4.0') || has('patch-8.2.0750')
  nnoremap <silent><nowait><expr> <C-f> coc#float#has_scroll() ? coc#float#scroll(1) : "\<C-f>"
  nnoremap <silent><nowait><expr> <C-b> coc#float#has_scroll() ? coc#float#scroll(0) : "\<C-b>"
  inoremap <silent><nowait><expr> <C-f> coc#float#has_scroll() ? "\<c-r>=coc#float#scroll(1)\<cr>" : "\<Right>"
  inoremap <silent><nowait><expr> <C-b> coc#float#has_scroll() ? "\<c-r>=coc#float#scroll(0)\<cr>" : "\<Left>"
  vnoremap <silent><nowait><expr> <C-f> coc#float#has_scroll() ? coc#float#scroll(1) : "\<C-f>"
  vnoremap <silent><nowait><expr> <C-b> coc#float#has_scroll() ? coc#float#scroll(0) : "\<C-b>"
endif

" Use CTRL-S for selections ranges.
" Requires 'textDocument/selectionRange' support of language server.
nmap <silent> <C-s> <Plug>(coc-range-select)
xmap <silent> <C-s> <Plug>(coc-range-select)

" Add `:Format` command to format current buffer.
command! -nargs=0 Format :call CocActionAsync('format')

" Add `:Fold` command to fold current buffer.
command! -nargs=? Fold :call     CocAction('fold', <f-args>)

" Add `:OR` command for organize imports of the current buffer.
command! -nargs=0 OR   :call     CocActionAsync('runCommand', 'editor.action.organizeImport')

" Add (Neo)Vim's native statusline support.
" NOTE: Please see `:h coc-status` for integrations with external plugins that
" provide custom statusline: lightline.vim, vim-airline.
set statusline^=%{coc#status()}%{get(b:,'coc_current_function','')}

" Mappings for CoCList
" Show all diagnostics.
nnoremap <silent><nowait> <space>a  :<C-u>CocList diagnostics<cr>
" Manage extensions.
nnoremap <silent><nowait> <space>e  :<C-u>CocList extensions<cr>
" Show commands.
nnoremap <silent><nowait> <space>c  :<C-u>CocList commands<cr>
" Find symbol of current document.
nnoremap <silent><nowait> <space>o  :<C-u>CocList outline<cr>
" Search workspace symbols.
nnoremap <silent><nowait> <space>s  :<C-u>CocList -I symbols<cr>
" Do default action for next item.
nnoremap <silent><nowait> <space>j  :<C-u>CocNext<CR>
" Do default action for previous item.
nnoremap <silent><nowait> <space>k  :<C-u>CocPrev<CR>
" Resume latest coc list.
nnoremap <silent><nowait> <space>p  :<C-u>CocListResume<CR>

" https://stackoverflow.com/a/30008892/12660859
highlight Pmenu ctermfg=15 ctermbg=8 guifg=#ffffff guibg=#0000ff
As described in its github repo, coc.nvim has lots of extensions that can enabel language support and other fancy functionalities, to install them, we need to fire up Vim and use Vim command (if you don’t know what that is, you should probably try the vanilla Vim first before jumping into this rabbit hole):
:CocInstal coc-pyright coc-json coc-pairs coc-word coc-snippets
After installation, I want to add some customization to these extensions so they suites my usage better:
" -------------
" set snippet
" -------------
" Use <C-l> for trigger snippet expand.
imap <C-l> <Plug>(coc-snippets-expand)

" Use <C-j> for select text for visual placeholder of snippet.
vmap <C-j> <Plug>(coc-snippets-select)

" Use <C-j> for jump to next placeholder, it's default of `coc.nvim`
let g:coc_snippet_next = '<c-j>'

" Use <C-k> for jump to previous placeholder, it's default of `coc.nvim`
let g:coc_snippet_prev = '<c-k>'

" Use <C-j> for both expand and jump (make expand higher priority.)
imap <C-j> <Plug>(coc-snippets-expand-jump)

" Use <leader>x for convert visual selected code to snippet
xmap <leader>x  <Plug>(coc-convert-snippet)

inoremap <silent><expr> <TAB>
      \ coc#pum#visible() ? coc#_select_confirm() :
      \ coc#expandableOrJumpable() ? "\<C-r>=coc#rpc#request('doKeymap', ['snippets-expand-jump',''])\<CR>" :
      \ CheckBackSpace() ? "\<TAB>" :
      \ coc#refresh()

function! CheckBackSpace() abort
  let col = col('.') - 1
  return !col || getline('.')[col - 1]  =~# '\s'
endfunction

let g:coc_snippet_next = '<tab>'

" CCX: to change Pmenu color
" https://stackoverflow.com/a/30008892/12660859
highlight Pmenu ctermfg=15 ctermbg=8 guifg=#ffffff guibg=#0000ff
Pyright requires certain stubs files to lint codes better (to help with annotating pacages).
For this, simply copy all folders from python-type-stubs to ~/.config/coc/extensions/node_modules/coc-pyright/node_modules/pyright/dist/typings.
For coc-snippets to work, we need to install vim plugin vim-snippets, at the same time, let’s add sheerun/vim-polyglot, preservim/netdtree and preservim/nerdcommenter:
Plugin 'sheerun/vim-polyglot'
Plugin 'preservim/nerdtree'
Plugin 'honza/vim-snippets'
Plugin 'preservim/nerdcommenter'
and as usual, the following in your command line:
vim +PluginInstall +qall
To activaet them, add the following to your .vimrc:
" Nerd tree toggle
nnoremap <leader>nt :NERDTreeToggle<cr>

set colorcolumn=80
"set synmaxcol=500
"set lazyredraw
"set nocursorcolumn
"
" -------------
" nerdcommenter
" -------------
" Create default mappings
let g:NERDCreateDefaultMappings = 1

" Add spaces after comment delimiters by default
let g:NERDSpaceDelims = 1

" Use compact syntax for prettified multi-line comments
let g:NERDCompactSexyComs = 1

" Align line-wise comment delimiters flush left instead of following code indentation
let g:NERDDefaultAlign = 'left'

" Set a language to use its alternate delimiters by default
let g:NERDAltDelims_java = 1

" Add your own custom formats or override the defaults
let g:NERDCustomDelimiters = { 'c': { 'left': '/**','right': '*/' } }

" Allow commenting and inverting empty lines (useful when commenting a region)
let g:NERDCommentEmptyLines = 1

" Enable trimming of trailing whitespace when uncommenting
let g:NERDTrimTrailingWhitespace = 1

" Enable NERDCommenterToggle to check all selected lines is commented or not
let g:NERDToggleCheckAllLines = 1
Finally, to run python from vim, I use hanschen/vim-ipython-cell which relies on jpalardy/vim-slime.
To install them:
Plugin 'jpalardy/vim-slime'
Plugin 'hanschen/vim-ipython-cell'
and
vim +PluginInstall +qall
That’s it! We’ve now installed:
- vim
- neoclide/coc.nvim
- vim-airline/vim-airline
- vim-airline/vim-airline-themes
- jpalardy/vim-slime
- hanschen/vim-ipython-cell
- rakr/vim-one
- sheerun/vim-polyglot
- preservim/nerdtree
- honza/vim-snippets
- preservim/nerdcommenter
Simply go to their homepage to see how each and everyone of these plugins works. (yes I’m lazy to document how to actually use them… maybe I’ll do it later)
Atom is dead, long live Vim!